
A delivery record is easier to hand over when its supporting document and the explanation of recent changes are available in the same place. Data's File fields hold attachments, and a saved record's History tab shows recorded changes to that record.
This tutorial follows a small equipment supplier reviewing a delivery. You will attach a fictional delivery note, verify that it was saved to the correct record, make a clear review update, and inspect the change history. The technique also works for inspection photos, service worksheets, and documents supporting a customer request.
Before you begin
You need access to Data, permission to edit records, and a table with a File field. Creating the field requires table-management access. If you can read records but cannot add or remove files, ask the table manager to check your access.
Allow about 20 minutes. Prepare a small PDF named delivery-DLV-204-demo.pdf containing fictional information only:
| Item | Example content |
|---|---|
| Delivery reference | DLV-204 |
| Recipient | Harbour Training Demo |
| Delivery date | 9 September 2026 |
| Items | One projector and one carry case |
| Note | Training example; check both items before completing review |
The file should be readable and comfortably below the limit displayed by the uploader. A newly created File field normally accepts one file, with a default maximum of 10 MB. Existing fields can have different settings, so follow the on-screen limit and any file-type error.
1. Identify exactly what the document supports
Use a table where one record represents one delivery. Do not attach the note to a general customer row if that customer has several deliveries and the document only supports one of them.
For the exercise, use Delivery evidence practice with the following fields. If you need help creating the table, start with the Data table setup guide.
| Field | Type | Purpose |
|---|---|---|
| Delivery reference | Text | Identifies the delivery |
| Recipient | Text | Names the receiving business |
| Delivery note | File | Holds this delivery's document |
| Review notes | Text | Explains the current review outcome |
Create a record for DLV-204, recipient Harbour Training Demo, with Review notes set to “Delivery note awaiting review.” Save it before continuing. A separate, saved record gives you a clear place to attach the document and an existing history to inspect.
2. Add a File field if the table needs one
Open the table's Fields tab and select Add field. In New field, enter Name Delivery note, confirm Key delivery_note, and select Type → File. Under Display, add helpful text such as “Attach the document that carries this delivery reference.” Select Add field.
Leave the field optional if the team creates delivery records before the document arrives. Making it Required would stop new records being saved without an attachment. This is a process decision: a required document may suit a completed-inspection register but be inconvenient for incoming work.
For this exercise, use the default single-file behavior. The current field editor does not provide controls for every possible file setting. If you need a delivery note and a photo as separate pieces of evidence, you can create a second File field with a clear purpose, such as Handover photo.
3. Open the right record and upload the document
Return to Records, find DLV-204, and use the arrow at the right of its row to open it. Confirm the delivery reference and recipient in Details before touching the attachment field.
In Delivery note, select Drop a file here or click to choose, then choose delivery-DLV-204-demo.pdf. You can also drag the file onto the drop area. Wait for the progress indicator to finish and for the file to appear in the list with its name and size.
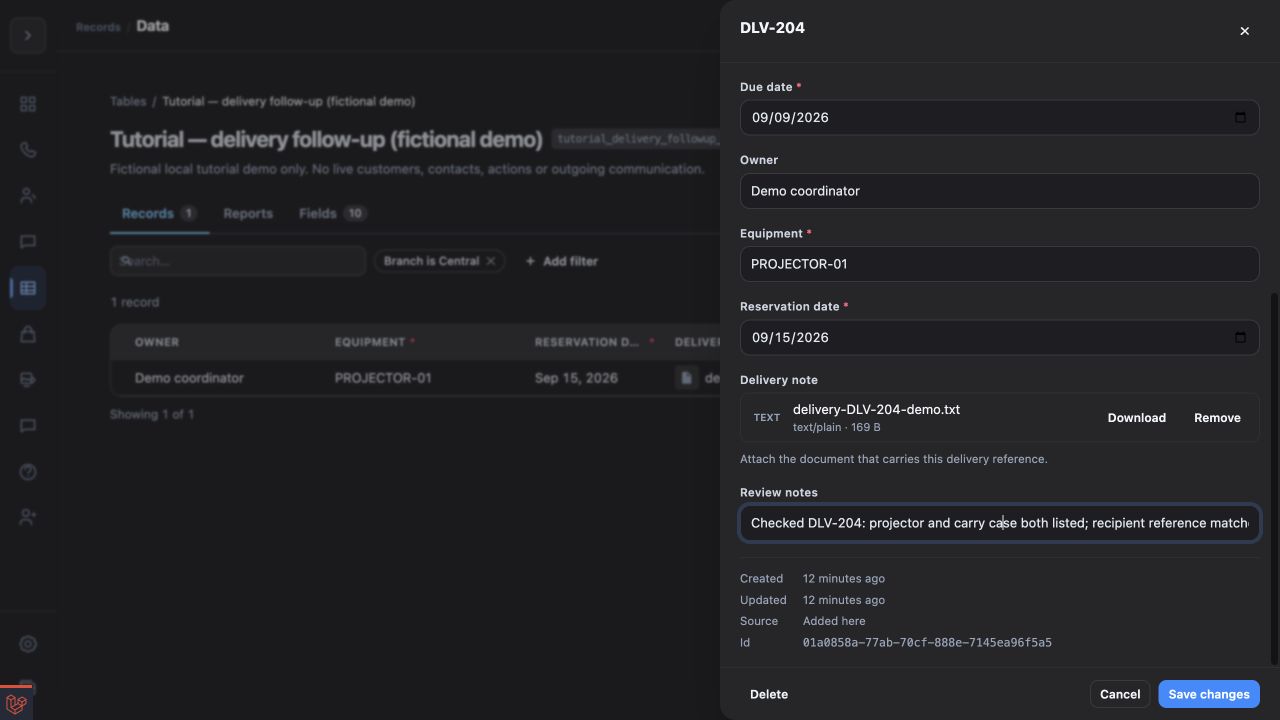
Illustrative local demo with a fictional document. Check the record identity and confirm the attachment appears after saving. Open the screenshot.
Uploading transfers the file, but the form still needs to save the attachment on the record. Keep the drawer open until the upload succeeds. A filename sitting in a failed upload row is not a saved attachment.
4. Save and reopen to verify the attachment
Select Save changes. When the drawer closes, open DLV-204 again and confirm that the Delivery note field still lists the file.
This reopen check catches an easy mistake: closing or cancelling the record form after the upload completed. The attachment belongs to the record only after the record save succeeds. Also check any validation error elsewhere in the form, because another required field can prevent the entire save.
Open the file by selecting its name or thumbnail. Confirm that its contents show DLV-204 and Harbour Training Demo, and that both equipment items are readable. Matching filenames alone are not enough when somebody has selected the wrong document from a downloads folder.
5. Review the document in the viewer
The viewer can display supported images, PDFs, text, audio, and video. Browser support can affect individual formats. Some accepted documents, including office files, may show No preview for this type of file with a Download button instead.
Use Download when a preview is unavailable, then open the file with an appropriate application. A missing inline preview does not automatically mean the upload failed; the saved file and the browser's ability to display it are separate checks.
Close the viewer to return to the record. Keep the document's role clear: attaching a delivery note records supporting material. It does not itself verify that goods arrived or complete an approval process.
6. Record the review outcome as an explicit edit
In Details, update Review notes to “Checked DLV-204: projector and carry case both listed; recipient reference matches.” Select Save changes.
Use a factual note that another colleague can act on. “Done” is hard to interpret later: it could mean the file uploaded, the document was read, or the delivery was completed. If something is missing, write the specific next action, such as “Carry case not listed; ask dispatch to confirm before closing the delivery.”
Reopen the record and confirm the new note. The current Details values should express the latest operational position; the History tab provides context about how those values changed.
7. Inspect the record's History tab
Select History in the saved record drawer. You should see recorded events with an action, an actor label, a writer kind, and a time. Edits show the affected fields with their previous and new values. In this example, look for the Review notes change and the earlier attachment update.
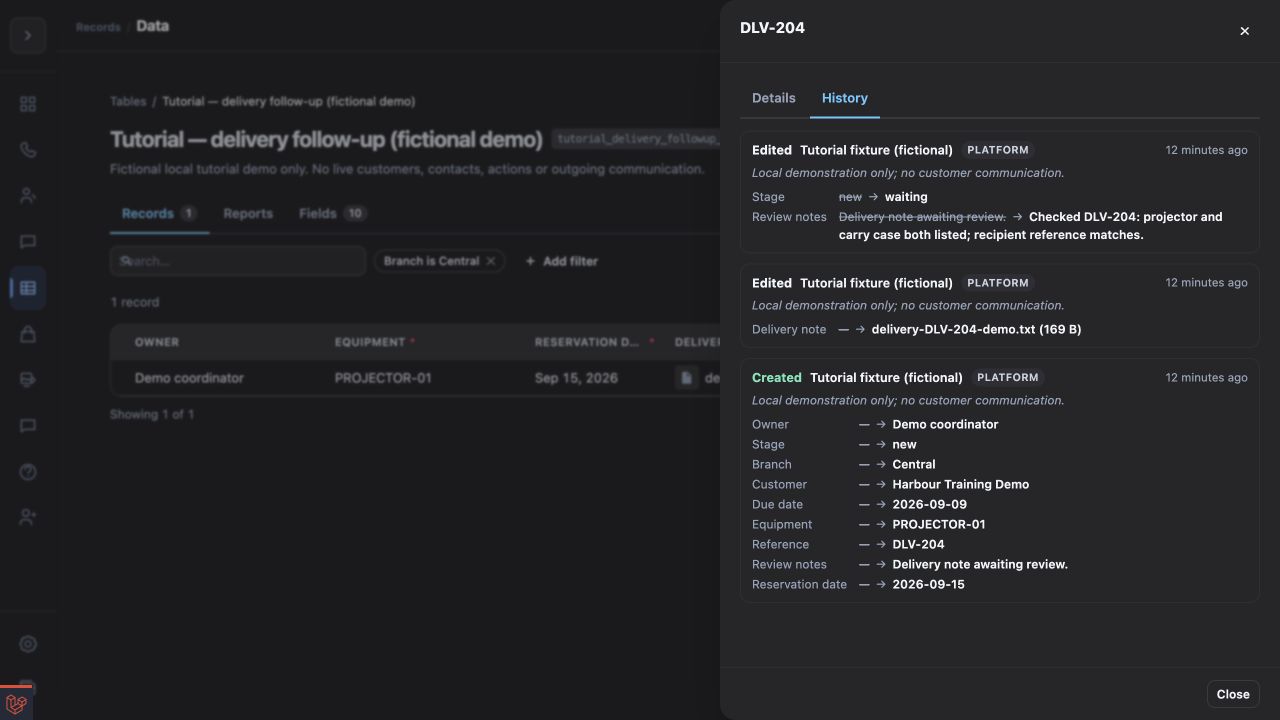
Illustrative local demo with fictional changes. History helps explain the edits behind the current record values. Open the screenshot.
Entries can come from a Person, API key, Assistant, Flow, or another supported writer. Check the label rather than assuming every edit was typed by a colleague. A reason appears when the action supplied one; the ordinary record form does not ask for a separate reason on every save.
Use Load older when available to move back through earlier entries. New unsaved records do not have a History tab. An older record can also have no entries from before history began being recorded, so an empty history is not proof that the record never changed.
8. Understand replacement and removal before using them
For a default single-file field, Remove takes the attachment out of the form and reveals the upload area again. To replace the document, remove the old file from the form, choose the corrected file, wait for its upload, and select Save changes. Reopen the record and check the new contents.
To practise removal, use a disposable record with a disposable document. Select Remove, save, and reopen; the file should no longer be attached. If you only want to inspect the control without changing the record, cancel the form instead of saving.
History can describe a file change using its name and size. It is not a document-version library, and this drawer does not offer a Restore button for historical file contents. Keep any original your process requires in its designated storage before replacing or removing an attachment.
Troubleshoot the handover
The upload is rejected: check the displayed size limit and file-type error. Export a readable PDF or use another accepted format appropriate to the field; changing a filename extension does not convert the file.
The document disappears when you return: confirm that both upload and Save changes completed. Resolve form errors and repeat the reopen check.
An old download link fails: reopen the record to obtain a fresh link. File links expire, and removed files may no longer be available. Share the record through your usual workspace process instead of treating a copied download link as permanent storage.
History does not show the expected edit: make sure you reopened the same saved record and actually changed a value. Saving an unchanged form does not create a meaningful new edit. Check older entries and the writer label if automation is involved.
The completed exercise leaves one identifiable delivery record, a verified attachment, and an understandable review note with recorded change context. Use focused record filters to find the deliveries that still need attention.